Objektorientierung in JavaScript (ES6) mit P5.js
Wie angekündigt und vorbereitet wollte ich mindestens die lange Bahnfahrt während der Reise zur Geburtstagsfeier meines Vaters dazu nutzen, mich mit P5.js und der Objektorientierung in JavaScript (ES6), sowie der Zusammenarbeit mit Visual Studio Code (mit p5.vscode) vertraut zu machen. Das klappte erstaunlich gut, denn WLAN scheint das einzige zu sein, was noch bei der Deutschen Bahn funktioniert.
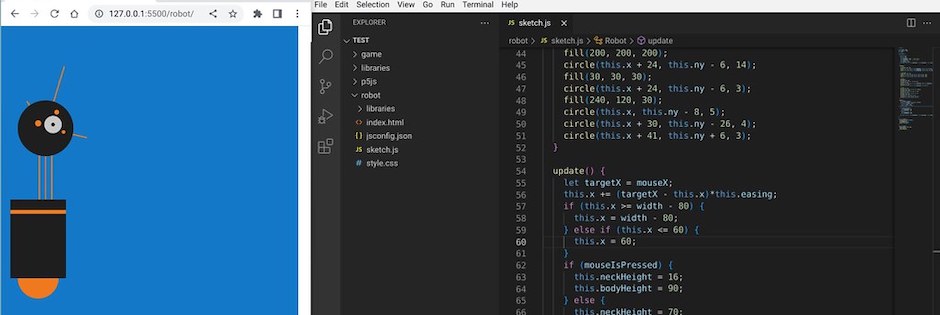
Um einen ersten Einstieg in die Objektprogrammierung mit ES6 zu bekommen, hatte ich die Roboterbeispiele aus dem Buch »Getting Started with p5.js« (Seiten 38ff, 55ff und 84ff) von Lauren McCarthy, Casey Reas und Ben Fry, die dort noch prozedural programmiert waren (meine Kopie des Buches ist von 2015, also kurz vor Release von ES6 erschienen), in eine objektorientierte Fassung übertragen, die ich optisch auch noch ein wenig aufgehübscht habe:
// Robot 2

const WIDTH = 480;
const HEIGHT = 480;
let robot;

class Robot {

  constructor() {
    this.x = 60;
    this.y = 440;
    this.bodyHeight = 160;  // Body Height
    this.neckHeight = 70;  // Neck Height
    this.radius = 45
    this.easing = 0.04;
    this.ny = this.y - this.bodyHeight - this.neckHeight - this.radius;  // Neck Y
  }

  display() {
    // Neck
    stroke(240, 120, 30);
    line(this.x + 2, this.y - this.bodyHeight, this.x + 2, this.ny);
    line(this.x + 12, this.y - this.bodyHeight, this.x + 12, this.ny);
    line(this.x + 22, this.y - this.bodyHeight, this.x + 22, this.ny);

    // Antennae
    stroke(240, 120, 30);
    line(this.x + 12, this.ny, this.x - 18, this.ny - 43);
    line(this.x + 12, this.ny, this.x + 42, this.ny - 99);
    line(this.x + 12, this.ny, this.x + 78, this.ny + 15);

    // Body
    noStroke();
    fill(240, 120, 30);
    circle(this.x, this.y - 33, 33, 33);
    fill(30, 30, 30);
    rect(this.x - 45, this.y - this.bodyHeight, 90, this.bodyHeight - 33);
    fill(240, 120, 30);
    rect(this.x - 45, this.y - this.bodyHeight + 17, 90, 6);

    // Head
    fill(30, 30, 30);
    circle(this.x + 12, this.ny, this.radius)
    fill(200, 200, 200);
    circle(this.x + 24, this.ny - 6, 14);
    fill(30, 30, 30);
    circle(this.x + 24, this.ny - 6, 3);
    fill(240, 120, 30);
    circle(this.x, this.ny - 8, 5);
    circle(this.x + 30, this.ny - 26, 4);
    circle(this.x + 41, this.ny + 6, 3);
  }

  update() {
    let targetX = mouseX;
    this.x += (targetX - this.x)*this.easing;
    if (this.x >= width - 80) {
      this.x = width - 80;
    } else if (this.x <= 60) {
      this.x = 60;
    }
    if (mouseIsPressed) {
      this.neckHeight = 16;
      this.bodyHeight = 90;
    } else {
      this.neckHeight = 70;
      this.bodyHeight = 160;
    }
    this.ny = this.y - this.bodyHeight - this.neckHeight - this.radius;  // Neck Y
  }
}

function setup() {
  createCanvas(WIDTH, HEIGHT);
  strokeWeight(2);
  ellipseMode(RADIUS);
  robot = new Robot;
}

function draw() {
  background(20, 120, 200);
  robot.update();
  robot.display();
}
Es war mein erster Versuch mit P5.js und OOP, daher ist das Script sicher noch verbesserungswürdig (für Eure Vorschläge und Anmerkungen stehen meine Kommentare zur Verfügung), aber es funktioniert (siehe Screenshot). Den Quellcode findet Ihr auch in meinem GitHub-Repositorium.
Nachdem ich das WLAN der Deutschen Bahn erst einmal mit einer Update-Orgie gequält hatte (auf meinem Chromebook lief noch ein uraltes VS Code und p5.vscode war dort auch noch nicht installert), lief die Entwicklung wie geschmiert.
Da das Trackpad des Chromebooks und ich wohl nie richtig zusammenkommen, hatte ich kurz vor Reiseantritt dem Teil noch eine kleine, kabellose Logitech-Maus mit einem ebenfalls kleinen Mauspad spendiert. Das hat meine Produktivität enorm gesteigert. Ich kann das deshalb allen Trackpad-Verweigerern nur empfehlen.
Was kommt als nächstes: Ich möchte natürlich die P5.js-Scripte in die Seiten des Schockwellenreiters einbinden können. Welche Verrenkungen ich dafür mit Quarto anstellen muß, weiß ich noch nicht. Aber das bekomme ich noch heraus.
Und auch wenn vieles noch nach der »Versuch und Irrtum«-Methode läuft, werde ich zunehmend vertrauter mit Visual Studio Code. Wenn ich dann sicher bin, daß eventuell auftretende Fehler dem Programm und nicht mehr mir anzulasten sind, werde ich es auch mal mit der Alternative VSCodium versuchen. Momentan traue ich mich noch nicht. Still digging!